
The main data component of the application is the Client. Depending on how you use the platform, if for example you’re a TPA (Third Part Administrator), a Client can be a company, an employer, an organization, an addiction recovery facility, etc.
To add a new client, on the main application page, tap the icon to add a new client (highlighted in red below):
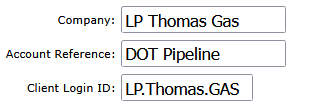
The first three components to enter are the company name, its account reference and their login ID.
In this example, the company name is LP Thomas Gas. The employees that will participate in random selections are DOT Pipeline workers (PHMSA) so the account reference could be entered as: DOT Pipeline. The company may also want their Non-DOT personnel subject to random selection testing as a part of their drug-free workplace program, in which case you would add a second account under the client as, for example, Drug-Free Workplace. Adding a second account for a client is the covered in another tutorial.
On the same page you can also enter the company address, check the box DOT, and choose their DOT Mode, if the account must comply with DOT regulations.
When the new client record is saved, you will have the option to add a company contact (client representative) and other manage other account options.